Thursday, January 31, 2019

The global map - fractals

One of the most common methods of terrain generation is Perlin Noise, which is a method of generating random-looking variation over a constant scale. Amit Patel (again) does this and it combines really well with a Voronoi map, because you simply use the noise map to decide which Voronoi cells count as land and which count as sea. Alternatively you can use Perlin Noise by itself. Minecraft uses a 3D version of this to generate its terrains.

As I may have mentioned, I'm not a mathematician, and I don't really understand how Perlin Noise (or its various relatives) actually works. But I do know how an older method of generating noise works, namely the diamond-square fractal algorithm. The method is pretty simple: you start with a square grid, and put random values in the four corners. Then you follow a number of steps whereby you fill in the rest of the grid using the average of the existing values, with random perturbations. I haven't explained that very well (there are lots of better explanations online!), but the interesting thing is that it produces surprisingly convincing-looking landscapes very quickly, using a method that's not hard to understand. It's been used for this purpose since the mid-80s and it still popular now. Hunter Loftis made a widely-shared application of the idea which demonstrates its power and speed - you can play with it online here.


Can we use this to make our global map? One problem is that the diamond-square algorithm only works on square grids (and they have to have sides that are a power of two plus one, to boot). But we can get around that by sticking several squares together to make a rectangle. The squares have to share their sides, and everything gets a little bit complicated, but we can use this method to make a rectangle of whatever proportions we like. We can also vary the size of the squares to control the scale of the features that emerge. Lastly, of course, we need to adapt the algorithm so that it wraps around the east-west borders but not the north-south ones.

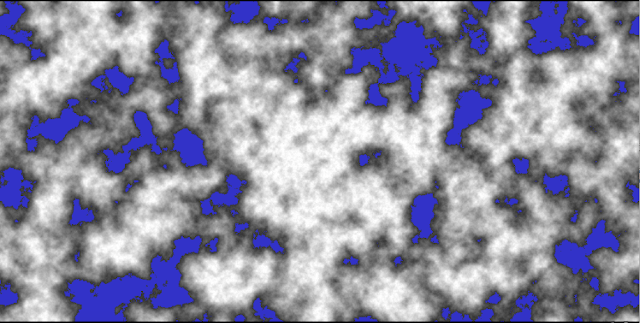
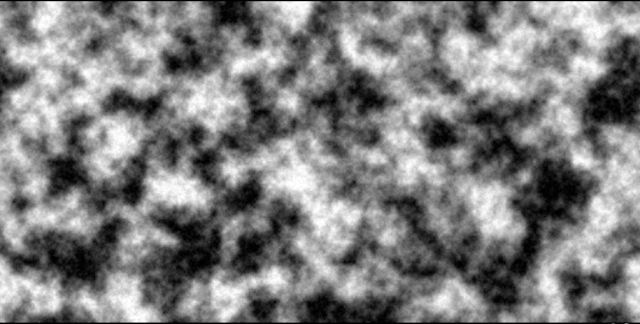
A lot of trial-and-error coding later, this is the result:


Dark areas are low in height, light areas are high. We can specify a particular height to be sea level, and render it so that any areas below that level are blue; we can also change the way we display the land, to give it more of a 3D-texture:


(I'll stick with the greyscale display method for the time being, though, as it's easier to see what's going on with the heights.)

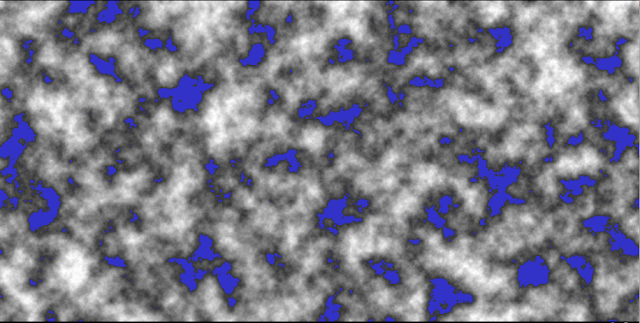
So that isn't totally terrible to start with. We can fiddle with the size of the squares within the rectangle to change the scale of the features that emerge. Here it is with larger squares:


And with smaller squares:


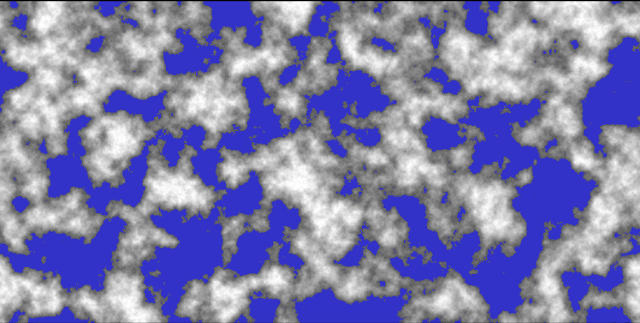
Now immediately we can see some issues with this. The ratio of sea to land isn't really right, but that's easy to fix simply by raising the sea level:


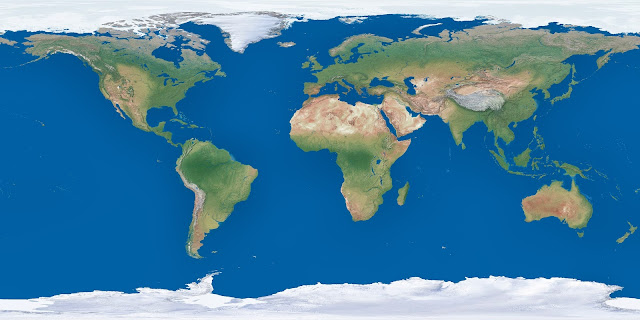
That's better, but not much better. For one thing, the land and the sea are both mingled more or less evenly across the whole map. Compare that to a map of the real world:


In reality, the land clumps together in continents, separated by oceans (actually one big ocean). The diamond-square fractal can't do that. Moreover, the diamond-square terrain undulates fairly evenly over the whole surface. But on the real world map, most land is mostly flat, except for where it rises up into relatively narrow, well defined mountain ranges. The diamond-square fractal can't do that, either.

The diamond-square, and similar fractals and methods of noise generation, are great for making terrain at the small scale - a single island, or valley, or mountainside. Hunter Loftis's function, linked to above, demonstrates that very well. But it's terrible at making terrain at the large scale - a continent or a whole world - because it cannot generate large-scale coherent structures such as oceans and mountain ranges. You can get away with using this technique for larger areas if you're not too bothered about making something that looks like a real world map. For example, Dwarf Fortress uses fractals of this kind, or something very similar. It produces "world" maps that are really continental maps, and those really resemble smaller islands scaled up. That's fine for DF, which isn't really about the landscape, but I'd like something that can create genuinely world-scaled maps that look more believable. Fractals of the kind we've been looking at here will play a role in that, but they can't provide the basic approach to generating the terrain.

World generation: the basics

So how best to model a world?

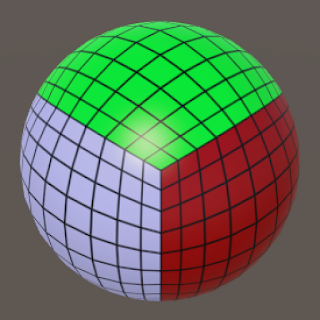
Ideally of course we'd make a spherical model, but that is horribly complicated and involves lots of maths. A slightly simpler method is to use a cube-sphere, which is basically a cube that's distorted to look like a sphere.


This allows you to store your terrains in square arrays, which is simple, without too much distortion. So a lot of games that portray planets, such as Spore and No Man's Sky, do this. This method also allows you to set up a quadtree system, which means that as you zoom in to the cube-sphere you can create new levels of detail, giving the impression of a huge, massively detailed world. That's what No Man's Sky does. But I'm not doing it, because it's too difficult.

(I may, in the future, adapt my terrain generation methods to a cube-sphere system. I'm reasonably sure I know how it could be done, at least in theory. But not for now.)

Instead, I'm going to generate flat maps. The world will be twice as wide east-west as it is north-south, and it will wrap from east to west but not from north to south. That means, in effect, that the world is a huge cylinder. This is unrealistic, but for my purposes it's good enough. In the real world, because we don't tend to think about the poles, we do think of the world as a big cylinder for all practical purposes.

This also means that the map will contain more temperate/subpolar regions, and fewer tropical/equatorial ones, than a genuine sphere would. But, again, that's something I can live with.

What sort of structure should the map have? One method that seems to be popular at the moment is the Voronoi diagram. This basically splits up the map into irregularly-shaped cells, and then you use these cells as the basic components of your terrain. This results in an automatically irregularly-shaped terrain that avoids unwanted straight lines and the like. Amit Patel has popularised this method, and it's the one used by both Martin O'Leary and Scott Turner as well as Max Ganiev and I'm sure lots of other people too. The problem with it, though, is that while it's excellent for making maps, it's not good for storing information about terrains. With this method, you can't tell the height of any given point on the map, only that of each Voronoi cell. You can't really model any other features of the world, such as weather; in fact to do that you have to convert your Voronoi map into a traditional array and then back again. In other words, manipulating data in a Voronoi diagram is appallingly difficult, but that's what we need to do if we're going to model the world as opposed to just make a map.

So I'm not going to use Voronoi diagrams. (I'm not going to use hexes either, as Shelby Maddox does, because I want the worlds to look as natural as possible rather than tiled.) I'm going to store my worlds as traditional, 2D arrays, which you can think of as simple rectangular grids. Each point on the grid corresponds to a point in the world. We can have one array to store the height of each point, one grid to store the wind speed at each point, one to store the temperature, and so on. And I'm going to display this information using proper old-fashioned raster graphics, none of this fancy Scalable Vector Graphics. Undiscovered Worlds is old-school.

So having established all that, how do we generate our world? As explained in the first post, UW follows a two-part process:

(1) Generate a global map.
(2) When prompted, generate a regional map based on a small part of the global map, but more detailed.

Our first task, then, is (1).

Aims and methods

(Note: A lot of the information here is out of date, as you can see from looking at later posts, but I've left it as it is to reflect the state of the project at the time this post was written!)

Perhaps the most important thing to say about this project is that I'm a complete amateur. I am not a programmer or a computer scientist; I'm not a geographer; I'm certainly not a mathematician. The process of making Undiscovered Worlds is basically one of me trying to find workarounds to avoid, with great difficulty, problems that real programmers would solve with ease.

Inevitably, then, UW is wildly inadequate in many ways and horribly bug-ridden. By nature I'm a perfectionist, but the process of hacking this thing into shape has lowered my standards to the point where I'm generally happy when it produces decent-looking results most of the time.

I'm programming this in AppGameKit tier 1, which is really a version of BASIC. Don't judge me - I said I'm not a proper programmer. This is an amazingly unsuitable language for a project of this kind, but, well, it's what I know, and this is a personal project for fun. I do know some C++ and intend to translate UW over to that language once it's functioning fairly well. The structure of the language is not really all that different so I'm hoping, probably vainly, that while this will be a lengthy and tedious process, it won't be too difficult. As it stands, though, the program does function, more or less. I've only adapted three short functions by other people - one to draw splines, one to draw blines, and one to draw circles. Apart from these it's entirely my own work, which I'm quite pleased about.

So what's the purpose of all this? Really, my interest is not in maps as aesthetic ends in themselves; it's in getting the computer to create imaginary worlds, complete with procedurally generated flora, fauna, and perhaps even civilisations. So the maps that UW is creating are only really tools to help explore the generated world, not the end purpose of the program. In that respect, my goal is different from Scott Turner's in Here Dragons Abound, as he is explicitly interested in the maps rather than the places they depict. The same applies, I think, to Martin O'Leary's Uncharted Atlas project, which is focused on creating maps of a very particular style. Obviously I'd like my maps to look good, but I'm not mainly focused on their aesthetics.

My aim overlaps a bit more with that of Tarn "Toady One" Adams' Dwarf Fortress, which is all about simulating a world to such an absurd level of detail that interesting narratives are spontaneously generated by the player's interactions with the model. The interesting thing here is that when you start a new game in Dwarf Fortress, it creates a new world from scratch for you to play in, and this includes not only its geography but a fabulously detailed history, including the rise and fall of civilisations, the life stories of thousands of historical characters, cultural events, mythologies, and more. You can browse all of these in a horribly unwieldy encyclopaedia - the insanity-inducing "Legends Mode" - which for me at least is more interesting than actually playing the game.

Obviously I can't possibly hope to match that level of complexity, and I'm not trying to make a game, at least not for now, but this idea of a procedurally generated world that can be examined as if browsing a huge atlas is what I would like to emulate. Adams' interest is primarily the civilised world - the actions of dwarves, humans, elves, and other intelligent creatures, and the history they act out. The physical world itself isn't really the focus of his simulation, and there the modelling is actually quite straightforward (and not always tremendously realistic). So I'm more focused on that than he is. (I also hope that my maps are a bit more intuitively comprehensible and pleasing to the eye than his notoriously impenetrable ASCII art.) Moreover, he isn't interested at all in procedural generation of the non-intelligent living world. The worlds of Dwarf Fortress are all stocked with mostly familiar trees and plants, and animals and races, from the real world and fantasy. Some individual creatures are procedurally generated, but not species and not ecosystems. By contrast, I'm really interested in exploring this. What plants and animals might evolve on other worlds with different geographies from our own?

So in that regard my aims also overlap with No Man's Sky, which does create procedural fauna and flora to populate its planets. But these animals and plants are very simple: they are really just scenery (mobile or otherwise), without clear ecological or evolutionary relationships to each other. Clearly I can't hope to match that game's amazing visuals, or to create morphable animated creature models, but I can perhaps aim to describe procedurally generated species that make sense within a wider ecosystem.

So my rather vaguely defined aim with this project is to get the computer to create worlds that model the following three domains:

(1) The physical geography, including terrain, water, and climate.
(2) The ecosystem, including plant and animal species with their ecological and evolutionary relationships to each other.
(3) Intelligent life and civilisations, with their broad sweep of history.

At the moment, I'm immersed in (1) and have advanced it to the stage where it's worth making this blog about it. I'm looking forward to getting to a stage when I can start tackling (2), which I think is potentially the most unusual element of this project. (3) is a distant pipe dream which may never happen, but it's nice to have it at least as a possible aim.


Welcome to Undiscovered Worlds

Welcome to Undiscovered Worlds!

(Updated 10 March 2023)

Undiscovered Worlds is a world and map generating program. With it, you can do the following things:
  • Procedurally generate planets of varying sizes and types, including terrain and climate information.
  • Display different world maps: relief, elevation, temperature, precipitation climate zones, and rivers.
  • Procedurally generate much more detailed regional maps of areas of interest.
  • Export map images of global, regional, or custom areas.
  • Set parameters for custom worlds with particular terrain and climate types.
  • Import your own world terrain maps and generate climate information for them.
  • Adjust the colours and other render settings.
You can read the current patch notes here.

Screenshots

Here are some images to show what the program looks like:


And here are some maps made with UW. These are all exported directly from it, without any additional processing:


Here's an example of an imported terrain map, with climates and river placements by UW:


Download

You can download Undiscovered Worlds for Windows (only, right now) here.

Example maps to import into the program, to show the correct format, are here.

All of the source code is available here. Feel free to re-use it if you like, or to fork the project - please give me credit if you do!

Instructions for use

When you start the program, you are prompted to enter a seed number for the new world. You can choose a random number or enter your own, before clicking "OK" to begin the generation process.

Alternatively, you can load a previously created world, or create a custom world (see below).

When the world is ready, you will see the global map screen.

The global map screen

This screen displays a map of your world. The buttons to the left perform several functions:

"World controls" - these buttons let you create a new world, load in a different one, save the current one, or create a custom one (see below).

"Export options" - these allow you to export images showing maps of the world, or of a user-defined area (see below).

"Display map type" - these allow you to display different kinds of information on the map.

"Properties" - opens a window giving information about this world.

"Appearance" - open the settings to change the map appearance (see below).

"Zoom" - open up the regional map screen for the selected point.

You can also click on any point on the map to get more information about it, displayed in the panel at the bottom. This panel also contains two buttons that open monthly charts showing temperature and precipitation.

The regional map screen

This screen displays a map of a small area of your world, shown at a scale of approximately 1 pixel to 1 km. The buttons to the left perform several functions:

"World controls" - the button here lets you return to the global map screen.

"Export options" - these allow you to export images showing maps of the currently viewed region, or of a user-defined area (see below).

"Display map type" - these allow you to display different kinds of information on the map.

"Properties" - opens a window giving information about this world.

"Appearance" - open the settings to change the map appearance (see below).

To the top right of the screen is a mini-map showing the current region on a world map. You can click on this map to go directly to another region. You can also use the cursor keys to move to neighbouring regions.

As with the global map screen, you can also click on any point on the map to get more information about it, displayed in the panel at the bottom. This panel also contains two buttons that open monthly charts showing temperature and precipitation.

The map appearance settings

This window allows you to change the appearance of the relief maps. Note that any changes here will be applied to both global and regional maps. These changes are purely aesthetic - nothing about the world itself is changed here, and none of these changes affects the other maps such as elevation, temperature, etc.

The first tab shows the colours that are used to generate the maps. You can click on the colour boxes to bring up a colour picker. The program mixes these colours to create the relief maps - try changing them to see what sort of effect it has. You can also try making some colours identical to produce simpler maps - e.g. if you want the sea to be a single colour throughout, set "shallow ocean" and "deep ocean" to the same colour and turn off both shading and marbling on sea. Note that you can type new values directly into the boxes by clicking on them while holding down the control key.

The second tab has a number of other appearance settings.

"Shading" - this controls the pseudo-3D shading effect. The sliders allow you to change its intensity on land, on lakes, and on sea.

"Marbling" - this controls the marbling effect, which adds variety to the appearance of the maps. You can, again, change its intensity on land, on lakes, and on sea.

"Rivers" - this controls how many rivers are shown on the map. Only rivers with flow greater than the given number are shown, so the lower the number, the more rivers you will see. You can set different values for the global and regional maps.

There are also some other controls to the right. The "light" box allows you to change the apparent direction of the lighting. The "snow" box under it allows you to change the way the map displays the transition between snowy and non-snowy regions on the map. Finally, the "sea ice" button allows you to set whether sea ice is shown.

The buttons at the bottom right allow you to save or load settings, restore the defaults, and close the panel. Note that if you save the world from the global map screen, its appearance settings are saved with it and will be restored if you reload it. So you don't need to save the settings separately unless you plan to load them into other worlds.

If "Show mangrove forests" is selected, these will be shown in the appropriate locations on the regional map. The "Only cliffs use high base colour" is intended for non-tectonic planets, which sometimes have extensive high plateaux. Selecting this option will force the program to render these plateaux using the lower base colour.

The appearance settings are stored as part of the world, so if you save the world and reload it they will be restored. If you generate a new world it will inherit the current settings. You can also save the settings by themselves to load later, or click "Default" to reset everything.

The custom area export screen

This window allows you to export maps from a custom-defined area of the world. These maps are at the same scale as the regional map - 1 pixel to 1km - but they can be of larger areas. Note that very large areas may crash the program! You will be warned before attempting this, but it is wise to save the world before exporting to be on the safe side.

Click a point on the map to select a point. Do this again to select a second point, defining a rectangle. You can continue to click or drag the points to re-define the area. When you have the area you want, click on "export maps". There are also buttons to clear your selected area and to return to the global map screen.

The custom world screen

This screen allows you generate worlds to your own specifications. You can also import your own maps - created with an image editor - and turn them into Undiscovered Worlds worlds. In this way, you can create your own terrain, and have Undiscovered Worlds calculate the climates, rivers, lakes, etc. You can then explore maps of your world just like any other. The files used to create the Tolkien map shown above can be found here - have a look at these to get an idea of how to create your own.

On opening this screen, you will be prompted to choose the size of your custom world: 512x257, 1024x513, or 2048x1025 pixels. In each case, 1 pixel is roughly 16km.

Having selected the size you want, you will see several groups of buttons on the left.

"Import" - these buttons are for importing your own maps. They must be the same size as the world and in .png format. For the land, sea, and mountains maps, only the red values of the colours are important (so for example a point that's coloured 100, 50, 50 will be interpreted the same as one that's coloured 100, 0, 0 - both convey the value of 100 alone). (Note that you should set the colours on a scale from 0-255 - some paint programs allow you to do so on a scale from 0-100, so be sure to use the correct scale.)

The program will interpret the maps in the following way:

land map - only the red value is used. 0 indicates sea, and any higher value is elevation above sea level, in increments of 10. So e.g. 100, 0, 0 indicates a height of 1,000 metres above sea level.

sea map - only the red value is used. 0 indicates land, and any higher value is depth below sea level, in increments of 50. So e.g. 100, 0, 0 indicates a depth of 5,000 metres below sea level.

mountains map - only the red value is used. It shows the peak elevation above the surrounding land, in increments of 50. So e.g. 100, 0, 0 indicates a height of 5,000 metres above sea level.

volcanoes map - the red value shows the peak elevation above the surrounding land, in increments of 50.  A green value of 0 indicates an extinct volcano, or a higher value indicates an active volcano. A blue value of 0 indicates a shield volcano, or a higher value indicates a stratovolcano. So e.g. 100, 1, 0 indicates an active shield volcano with a height of 5,000 metres above sea level, while 70, 0, 1 indicates an extinct stratovolcano with a height of 3,500 metres above sea level.

In theory you only need a land map - the others are optional. It's important to note that the land map shouldn't show mountain ranges. Undiscovered Worlds does not treat mountain ranges as normal elevation. If you want to define your own mountain ranges, you must import a mountains map, on which you have drawn the lines of the main mountain ranges as indicated above.

Also, the land map doesn't have to be very detailed. If you want, you could simply use the values of 0 to show sea and 1 to show land, without bothering about specifying elevation beyond that. You can use the "land elevation" button in the "generate" section to add random elevation to your map.

"Generate terrain" - instead of importing your own maps, you can use these buttons to generate a new map from scratch. You can choose a "tectonic" map (roughly Earthlike, with continents and mountain ranges) or a "non-tectonic" map (a more alien terrain with unpredictable features). In each case a window will appear giving you more options to fine-tune the generation process. Note that these are very approximate, so you may need to reroll a number of times to get the kind of map you want.

"Generate elements" - once you have either imported or generated the world map, you can use these buttons to add extra features to it.

"Other controls" - the "Properties" option here allows you to set the world's properties, such as its gravity, orbital characteristics, average temperature, and more. Note that you can set many of these properties to much more extreme values than would normally be generated randomly, allowing for the creation of worlds with exotic climates. By default, all the values are Earthlike, so if you want to force a world with Earthlike properties, you can do that here too. You can also turn off rivers, lakes, and deltas here if you don't want them to be generated.

When you have finished, click the "Finish" button. This finalises the terrain and then calculates rainfall, temperature, rivers, lakes, etc. When it is finished, the custom world will be displayed in the global map screen as usual, and you can view or save it like any other.

Known issues

The ability to resize the window is turned off, because it messes up the mouse tracking. (You can minimise it, of course.)

Saving and loading worlds is slow, but it works.

Occasionally, exporting maps doesn't work. Save the world, restart UW, load the world back in, and try again. I don't know why this happens or why restarting UW usually solves the issue.

Continents occasionally appear with straight sides. The cause of this is unknown too, but it is rare.

The climate simulation is imperfect - it should give generally reasonable results, but don't expect it to give a highly accurate model. However, a perfect climate simulation would require a lot more processing power and time than I have available!

Rivers and lakes occasionally go haywire. Known cause: lakes are the work of the devil.

About this blog

This blog describes what I've done and roughly how I've done it, and will keep track of future developments, following the example of Scott Turner's amazing Here Dragons Abound.

The backstory: I've always loved the concept of computer-generated landscapes, feeling somehow that places that don't actually exist are much more interesting than those that do. Somewhere that a computer has created is yet to be explored by anyone, making it somehow more intriguing and more "real" in a strange way than a fictional place that has been invented (and therefore fully known) by a person. Back in the day I spent many hours tinkering with Vista on the Amiga, which took an incredibly long time to produce results that seem very primitive today, but which seemed to offer small glimpses into whole worlds.

So I've had a go at making something of my own. Undiscovered Worlds is, or will be, the result. It's very much a work in progress. The next post describes what I'm trying to achieve with it and where the project is headed, while the rest of the blog documents the creation process and describes some of the terrain generation methods that I'm using. (Note: it took a lot of iterations and rewrites to get this project to the state it's in now, so a lot of the earlier parts of the blog are superseded by later ones!)