Thursday, February 28, 2019

Tinkering with rivers and lakes

So far in this blog I've been describing stuff I've already done - in some cases so long ago that I'm rather hazy about what exactly I did. Time for something a bit more up-to-date, which might illustrate some of the kinds of problems I've been facing with this project, and particularly with the dreaded hydrological models.

I previously drew attention to a flaw with this image:


That blob on the river that flows southeast into the southern lake is a glitch. Here, the river suddenly plunges hundreds of metres down, to be just 1m above sea level - even though it then joins a river that has much higher elevation, and flows into a lake of higher elevation still. This is not a good thing (and I have seen it before elsewhere), so I thought I'd try to deal with it. What's causing it and how can we tackle it?

A look at an expanded visualisation of the tile in which the error occurs shows us in more detail what's going on. This is a height map with the rivers laid over it:


Here we have one main river with two tributaries. The main river enters the tile from the north, and flows out to the southeast. One tributary enters from the northwest, and the other from the west. The problem is associated with the second of these tributaries. At the point where it enters the tile, it's 800m above sea level. One point to the east, it's 140m above sea level. Then it turns northeast and is 1m above sea level, and the whole of the rest of the river remains at that height for the rest of the tile, only to join a lake whose surface is 803m above sea level in the next tile. You can see the dramatic drop in elevation near the junction of the rivers, where the terrain is shaded darker.

UW calculates the course of the main river in any given tile first. Then, it goes over that river again and works out the elevation of each point. It does this by establishing the elevation of the point at which it enters the tile, the elevation of the point at which it leaves the tile, and then simply steps the elevation down over the course of the river between those two points. Having done that, it then calculates each tributary in turn - first its course and then its elevation. When calculating the course of a tributary, UW stops when it reaches either that tributary's target point on the main river or another river cell (which could be part of another tributary, so tributaries could join up with each other before heading for the main river). It takes the elevation of this point - where the tributary first hits another river cell - to be the final elevation of the tributary, and works out its elevation along its length accordingly.

So what happened here? There's something wrong with Tributary 1 (the one that comes in from the northwest). UW doesn't work out any elevation for it in the river-carving phase. Instead, it just gets normal elevation worked out later on in the terrain-generating phase, for reasons as yet undetermined. This leads to two problems. First, it doesn't flow downhill all the way to the main river - instead it flows sometimes downhill and sometimes uphill, following the normal random variation of terrain. That's bad enough. But worse, this means that at the time when Tributary 2 is calculated, Tributary 1 has no assigned elevation at all. (Remember, the rivers are all done first, and only then is the rest of the terrain filled in around them; so if Tributary 1 doesn't get its elevation sorted in the river phase, it has to wait until the terrain phase to gets its elevation assigned.) That means that when Tributary 2 hits Tributary 1, the cell it's joining has no elevation - or, more accurately, its elevation is 0, since that's the default. As a result, when Tributary 2's elevation is calculated, it thinks it's trying to flow downhill to an elevation of 0, which is the bottom of the sea. So the tributary plunges down. The program only allows large rivers to carve below sea level (this is to stop enormously long inlets occurring for minor rivers), so it won't allow the river to drop below 1m above sea level. It does, however, recognise that this is lower than the elevation of the main river that the tributary then joins, so it drops the elevation of that main river to match it. The result is a river that suddenly drops to near-sea level, which looks wrong in itself and screws everything up in the downstream tiles.

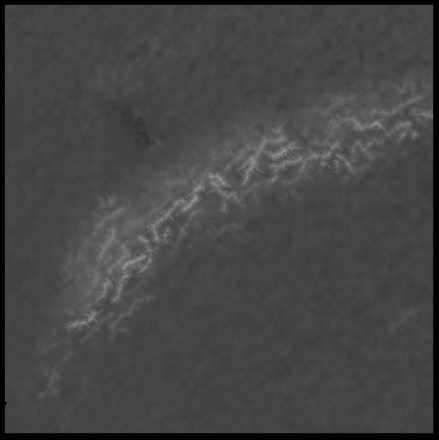
Tributary 2's problem is relatively easy to fix now we know what's causing it. I can add a function to the tributary elevation calculations which recognises if it's trying to flow down to an elevation of 0, and responds by tracing the course of the tributary until it reaches a river cell that has a higher elevation than 0, and making that its target instead. Now Tributary 2 works properly, and flows in a reasonably believable way to its junction with Tributary 1 and then into the main river without any sudden chasms:


Now Tributary 2 enters the tile at 800m and remains at that elevation until it reaches the highlighted cell, at which point it drops to 798m, which is the height of the main river. It stays at that height for the rest of the tile. Much better, and no weird artefacts:


Now if our aim were just to create that map image, we might leave it at that, because there's nothing obviously wrong with that map. You can't see on it that Tributary 1 sometimes goes uphill. But I don't want to leave it at that, because (a) I'd like to add a closer level of detail in the future, where any problems with the regional level would become much more apparent, just as many issues with the global map have become clear only when working on the regional map level; and (b) I'm a pathological perfectionist.

So why did Tributary 1 never get its elevation sorted in the river-carving phase, which was the underlying cause of this problem? It doesn't make much sense, because UW does the elevation of a tributary immediately after drawing the tributary itself. This tributary does get drawn, so why does it not then get its elevation done?

Some investigation reveals that the point at which the tributary joins the main river is actually slightly higher than the tributary's starting point. When this happens, the program is supposed to recognise it and calculate instead the drop from the tributary's starting point all the way to the exit point of the main river. Then it should work out the elevation of the whole river from the tributary's entry point to the whole river's exit point - in other words, recalculating the elevation of the main river from the point at which the tributary joins it. This ought to ensure that the tributary flows into the main river without going uphill. (And this was why, originally, Tributary 2 caused the whole river to be plunged down to 1m above sea level.) So this is what ought to happen here. Why then is it not happening?

Further investigation leads us deeper down the rabbit hole. The program is indeed calling the function that's supposed to calculate the tributary's elevation, and it's trying to recalculate the elevation of the whole river. But it's failing. Why? It thinks that the exit point of the main river is actually higher than the entry point of the tributary, so it's quitting the function without doing the elevations.

This initially puzzled me, because the entry point of the tributary is 814m and the exit point of the main river is 798m. But then I remembered: of course, that 814m at the entry point is the value that the terrain generating phase has assigned to that point after the rivers have been done (because, for reasons as yet unknown, this tributary hasn't got its elevation sorted before that point). The tributary-elevation function is getting the elevation at the entry point not by looking at the height map (because there isn't one yet) but by calculating what the elevation at that point should be. And this is done simply: it is calculated like this:

height = ( (elevation of source cell for this tile - constant) + (elevation of source cell for upstream tile - constant) ) / 2

The constant in that equation is used throughout river elevation calculations to ensure that rivers are lower than most of the other terrain around them. The higher that constant, the deeper the valleys carved by rivers.

So what this tells us is: the entry elevation of the tributary, as calculated by that formula, is too low. It's lower than the exit elevation of the whole river (which is also calculated by that formula, but with reference to the current source cell and the next source cell downstream). The program is therefore unable to calculate any elevation for the tributary and it just leaves it. The terrain generation phase then puts elevations under it as part of its normal terrain generation, including an elevation at its entry point that happens to be higher than the exit point for the whole river, leading to this baffling situation.

So now we've traced this whole horrible problem back to a single cause: the elevation of the tributary entering this tile is lower than the elevation of the river leaving this tile. Why?

Further investigation reveals the reason. The elevation of the source cell for the upstream tile (where the tributary is coming from) is 818m. The elevation of the source cell for the current tile is 814m. That seems fine. But the elevation of the source cell for the next tile downstream is 823m! That is why the elevation of the exit point for the river in our tile is too high, and that is what's causing all the trouble.

So then, the problem lies with the global map. Somehow, the river is flowing uphill, from a cell on the global map to a higher cell on that map. Now this should be impossible, because the global water flow is calculated (a) simply by marking on each cell the direction to its lowest neighbour, and (b) then tinkering with this to create a more natural-looking network, but only by sometimes redirecting flow to a lower neighbour other than the lowest one. There should never be a case where flow goes to a higher neighbour (because the Planchon-Darboux algorithm means that every non-coastal cell always has at least one neighbouring cell that is lower than it). So how has this happened?

I think the answer lies with the fact that the downstream tile - which is too high - borders a lake. In fact the lake spills over onto this tile:


This is how lakes work at the regional level: they are drawn on tiles whose source cells are either lake cells in the global map or next to lake cells in the global map.

And part of the function that draws lakes at the global scale checks that all the cells bordering them are at least as high as the surface level of the lake in question. That must be what's happened here. Originally, this cell was lower. When the lake was created, UW raised this cell so that it wasn't lower than the lake that it's next to (otherwise it would be weird - why doesn't the lake spill out?). But of course it didn't recalculate the water flow that had already been calculated over this cell. The result: water flowing uphill. And this had the horribly long and convoluted knock-on effect that we finally saw with the baffling phenomenon we started with, of the rivers at regional level inexplicably plunging down to sea level, carving great canyons, and then leaping back up impossibly. All caused by an issue with lakes - well, it would be, wouldn't it? I really hate lakes.

So what can we do about this? The extra-annoying thing is that I did anticipate this problem when writing the lake function (though I certainly didn't anticipate that it would manifest in this way), and I included a routine that's supposed to check around lake coasts and ensure that rivers going in and out do so properly without having to go uphill. Evidently something went wrong with that routine. I think that, surprisingly, the best solution is simply to remove that routine and every related element of the lake function that tinkers with the heights of neighbouring cells, and allow cells that border lakes to be lower than the surface level if they want to be. That sounds wrong, but we have to remember that at the global level, each cell is 32km across. It's perfectly possible that the average height of that cell could be lower than the surface level of the lake that it borders, but the bits that are actually next to the lake are still higher.

Doing this resolves the river problem. The source cells for our three tiles are now 818m, 814m, and 808m respectively. That means that the elevations of the entry/exit points all make sense, and the program is able to calculate the elevations of all rivers, including tributaries, correctly.

But there's another problem...

The tile where the river goes into the lake now looks like this:


Nothing wrong with that (the river's a bit straight, but we can live with that). Except that something's off with the elevation here too. The last point of the river in the previous tile was 794m above sea level. The first point of the river in this tile is 795m. So it's gone up a metre. It then stays at exactly this height until it hits the lake, which has a surface level of 803m. So it somehow climbs eight metres. What's happening now?

Without investigating too closely, I think that the problem here lies with the global lake generation as well. When the area of a lake is calculated, the program takes into account the heights of neighbouring cells; but it doesn't take into account the heights that rivers in the neighbouring cells would have (which are lower, for reasons already mentioned). So it doesn't check to see whether a river flowing into the lake would be lower than the surface level of that lake, at least not while it's actually making the lake. (As mentioned already, I did have a routine that tried to deal with that after the lake's area had been determined, but it clearly didn't work properly.) The solution, I think, is to tinker with the lake creation function itself. Lakes are made by picking a seed point on a river, and then extending them over neighbouring cells. They're set so that they can't extend over cells that are lower than the surface height, but I can try changing it so that they can't extend over cells that are lower than the elevation of the seed point, or that have rivers flowing into them that are lower than that elevation either. That way we should avoid having too-low rivers flowing into the lake.

Well, one result of that is that the lake is rather drastically reduced:


I'm just going to have to take it on faith that that resolved the problem with any other lakes that would have had this same problem, because I can't examine this case any more - the river we've been looking at doesn't even flow into the lake now. Instead it flows beautifully and plausibly into that larger river, not going uphill at all. Meanwhile, there aren't any issues with the river that does flow into the diminished lake from the southwest - at least until it hits the lake itself, at which point it jumps from 799m above sea level to a lake surface level of 803m. Argh! This is a different issue though, as the overall tile heights are working fine. Further tinkering to the lake creation function is needed: now it won't extend the area of the lake over cells that are lower than the surface area minus the constant that is subtracted from river elevations.

Well, I tried that, but it made no difference at all! Perhaps this problem lies in the way that the program calculates the river elevations at regional level once again. If the source cell of the next tile downstream is lake, then it takes the surface level of the lake to be the target elevation of the river at its exit point from the current tile. Otherwise it uses the formula given above. But what if the next tile downstream is technically next to a lake? The lake might still spill into it, and that would be where the river meets the lake. So I change the calculation: now it checks to see if the next tile downstream is next to a lake, and if so aims to drop the river to the surface level of that lake.


It still makes no difference. The main river comes in from the southwest there, at 799m, and stays that height until it flows into the lake, at 803m. Not only that, but there's a problem with the tributary coming in from the west too. It's not got its elevation done properly, just like Tributary 1 in the original tile. As a result, it starts at 800m and just goes randomly up and down until it flows into the main river. It's because it thinks, for some reason, that it should be starting at a lower elevation, which is lower than the elevation of the main river and therefore abandons the attempt. I don't know why this is, but it's something to do with the lake, because if I regenerate the world without lakes at all the river at this point (and indeed everywhere nearby) behaves itself perfectly.

Well, it's all in a very slightly better position than it was this morning. But as you can see, this thing is always two steps forward, one and eight-ninths steps backwards. I really hate lakes.

Monday, February 25, 2019

Grappling with lakes

This project has really taught me to hate lakes. There they sit, all smug and wet, lolling around in their basins with their multiple inflows and single outflows, all conforming to the laws of physics. They mock me with their impossible-to-model hydrological networks.

Large lakes really are the weakest element of Undiscovered Worlds at the moment. I've tried all kinds of different methods of implementing them, and none has really worked. A number of times I've seriously thought about just pretending they don't exist and hoping no-one would notice, but you can't really have all worlds be entirely lakeless. For now, they sort of work most of the time as long as you don't look too closely.

Why are they so wretchedly difficult? Lakes combine all the difficulties of coastlines with all the difficulties of rivers, plus some additional annoyances of their own. When we created them at the global level, we basically created artificial depressions at random points in the river network and added information in a special array giving the surface level of the lake at any given point. That allows us to have large lakes, covering many global-level cells (=regional-level tiles), at different elevations and with varying depths. We also tinkered with the rivers to try to ensure that each lake has only a single outflow, which is equal in size to all its inflows put together.

At the regional level, this all becomes something of a mess. First, my approach is to do the lakes first of all - before the rivers, even. The idea is that we really need to know where the lakes are before we calculate the paths of the rivers to influence those paths. For example, if we're calculating the path of a river that doesn't actually flow into/out of the lake, we want to make sure that it doesn't run into the lake.

So what UW does when creating the regional map is this: first, it goes through all the tiles whose source cells in the global map either are lake cells or next to lake cells. Then it creates terrain for that tile using the diamond-square method, exactly as I described before. (It also uses some of the same methods that we used for coasts, such as landfills, to try to make the lake coasts look more natural.) However, if the tile in question is next to a lake tile (rather than actually a lake tile), the edges of the tile are artificially raised to be higher than the surface of the lake. This ensures that the lake does not overflow these tiles. Then, all points that are lower than the surface of the lake are marked as lake. Then, UW ensures that all points adjacent to the lake are higher than the surface of the lake, and finally it deletes all terrain that isn't lake or immediately adjacent to the lake. So at the end of this pass, the terrain consists of just the lake beds. Then UW does the rivers, as described earlier, and only then does it do the real terrain, where it creates terrain around the lakes and rivers.

This is obviously wildly counterintuitive but I've found it to be the least bad way of doing this, as it allows for more control in the river calculations to try to make the rivers interact correctly with the lakes.

Still, it's horribly difficult to get everything to work properly. One perennial problem is rivers that emerge from lakes and then go back into them, which seem to crop up occasionally no matter how much I tinker with the global lake-making algorithms or the regional lake-drawing ones. I've tried creating new algorithms to remove them, but they are slow and unreliable. A better one I've recently hit upon is the idea of forcing all rivers that are sufficiently close to lakes to generate additional blobs of lake around themselves, which has the effect of expanding the lakes out where the rivers are close. This doesn't completely resolve the problem but it helps. I've also tried restricting lakes to only tiles that correspond to lake cells in the global map - that is, not allowing them to overspill into the neighbouring tiles at all. That tends to result in very artificial-looking lake coasts, though.

Anyway, the result is lakes like these:


These look fairly reasonable, but there are still issues. That dark blob near the river that flows into the northern coast of the southern lake marks a sudden drop in elevation, where the river plunges from over 700m above sea level to just 1m above sea level - an elevation it retains until it flows into the lake, the surface of which is over 800m above sea level. That doesn't seem quite right. I don't know why my rivers sometimes do this - there is some kind of bug in the carving algorithm that calculates the height of the terrain over which they flow, but I can't find it. As with so many of the problems with this program, it's just an occasional issue, which makes it very hard to isolate what causes it, especially as so many different systems are interacting - many just on the rivers alone (calculating the course, calculating the terrain height, working out where tributaries join main rivers, adding springs, etc.) - even before you take into account the lakes as well.

Rift lakes are easier than normal lakes, because they simply follow the course of the main river through that tile. All UW has to do is paste lake templates - roughly blob-shaped bits of lake - over the river as it passes through the tiles that have been marked on the global map as containing rift lake. Well, there's a bit more to it than that, but that's the basic idea. So these lakes are added after the rivers have been calculated. They look like this:


It's hard to get the coasts of these right (as usual). If the blobs drawn over the river are too smooth, you get something that just looks like very wide river, like a snake that's swallowed a slipper. I've tried to make the blobs more jagged and vary how and where they're drawn a little, resulting in the rougher-looking coasts you see here. I think they are rather rougher than real rift lakes, at the moment, but it's another work in progress to tinker with them.

(I do like the way you can see that the lake is causing more rainfall to the east - the winds are strong westerlies here - the result, according the climate model, is a small area of Mediterranean-style climate in the middle of that big desert.)

So that's the current status of large lakes. They have a nasty tendency to break the laws of physics and look rather artificial, but most of the time they roughly work, so I must just keep tinkering with them and hope they tend to improve rather than deteriorate further. Next up will be small lakes, which at the moment at least are more straightforward.

Wednesday, February 20, 2019

Tinkering with coastlines

I'm pretty pleased with how the coastlines have turned out, for the most part. But we need more variety.

I've already integrated one way of adding variety, which is to have a global "roughness" map. This is just yet another world-sized fractal. It influences the roughness of the diamond-square algorithm used to create the regional terrain. The higher the roughness at that tile, the more the algorithm will offset the values it assigns to points. That means that, among other things, the coasts will look a little wilder in "rougher" areas.

Also, landfills aren't used anywhere that sea ice is present, to make those coastlines look a bit rougher. The landfills tend to make for a slightly smoother appearance.

We need more though. One feature we currently lack is barrier islands. UW is quite capable of generating islands at both the global and regional levels, but barrier islands are distinctive in that they are very thin, lie close to the coasts, and mirror the coast.

The thing with barrier islands is that although they are quite common, they tend to cluster along particular coastlines. They are much more common along coasts that have low tidal range, that is, where there is little height difference between low and high tide. Tidal range, in turn, is affected by how exposed the coast is to the wider sea. More sheltered coasts - e.g. along Mediterranean-style inland seas - have smaller tidal range than coasts that face the open ocean.

Calculating tidal range properly would be pretty nightmarish, but fortunately it's not too hard to get a rough approximation that is good enough to make a vaguely plausible distinction between areas that are likely to have lots of barrier islands and those that aren't. On the global map, we take each coastal cell in turn. We then "cast" in all eight directions away from that cell - that is, we look along imaginary lines in all of these directions. For each one, we keep going until we hit land, and remember how long the line got. Then we add all eight of those numbers together. The higher the total, the more exposed the coast is and the higher its tidal range.

Barrier islands are too small to show on the global map, of course, so they only appear on the regional map. Drawing them is pernickety but fairly straightforward. It's a matter of finding the coastline on the tile, then copying it a couple of cells out to sea, with occasional breaks in the copy and occasional links to the land. The tricky bit is ensuring that we don't accidentally create sections of sea that are entirely enclosed by land, so we have to keep track of whether the lagoon (the area of sea between the island and the mainland) at each point is open to the sea or not.

This results in tiles that look like this:


And in regional maps that look like this:


They're hard to see as they're only one pixel across, but they're there.

Another feature we can add for more variety is glaciation effects. Wherever there are (or have been) glaciers, you tend to get very jagged coastlines with lots of fjords and little islands. Think Norway, of course, or Chile, or the west coast of Scotland. A fairly easy way to get a vaguely reasonable imitation of this, that looks nice though doubtless wouldn't be remotely convincing to a glaciologist, is simply to extend the mountains into the sea. So at the global level, we go over the coastlines. If we find any that are below a certain temperature, and that have mountains along them (of whatever height - remember that "mountains" might be fairly low hills), we add extra ridges sticking out into neighbouring sea cells, without adding any land below them. These don't show on the global map, and these cells are still considered sea rather than land. At the regional level, these mountains are drawn, and they give the effect of jagged coasts with lots of islands:


It's not perfect, but I still like to think Slartibartfast would approve.

Saturday, February 16, 2019

Carving the rivers

We've got basic terrain, coastlines, and mountains - the bones of the world. But rivers make it feel alive.

Thanks to our work at the global scale, we know the amount and direction of water flowing through every tile of the map. Our task at the regional level is to work out precisely what route it takes through each tile, and to find a way to make that affect the terrain via erosion. We'll store flow volume and direction on an array for the regional map just like the global map. But where almost every cell in the global map (apart from oceans and deserts) has at least some flow on it, this will not be the case for the regional map. So this will look much more like a river map as opposed to a water drainage map.

We can start by repurposing the code from the mountains. The method we used for tracing mountain ridges - from the corners or edges of the tile, via splines, to a central junction point - will work equally well for rivers. For any given tile, there may be water entering the tile from several directions, but it exits in only one direction. All of that information comes from the source cell in the global map, of course. So UW sorts through the flows entering the tile and finds the largest. That is the "main" river of the tile. UW then draws that river, first to the central junction, and then from the central junction to the exit point. It uses splines exactly as it did for the mountains, not worrying about calculating things like meanders, which would rarely be visible at this scale (remember, each cell on the regional map is 2 km across).

There's some additional jiggery-pokery needed though, because the spline function never yields diagonals - it always draws lines that go up then across (or vice versa). We don't want that all the time for the rivers. So I add a function that goes over the drawn river and cuts some of the corners, to produce a more realistic effect.

This gives us tiles that look like this:


Like the global river map, the regional river map stores direction of flow, and flow volume in both January and July. The volume for each cell within that tile is just copied from the flow volume of the source cell on the global map.

This gives us river maps that look like this (darker blue indicates more flow):


Obviously we want the tributaries to meet up with the main rivers. This is harder than it was for mountains, though. There, it didn't matter if the ridges entering a tile all met at the same point - that wouldn't look odd (and in any case there were almost never more than three or four ridges entering the same time). Here there could easily be six or seven flows entering the same tile, and it would look very weird for them all to meet at the same point. Rivers don't do that.

So for each lesser flow that's entering the tile, we have to find a unique point for it to join up with the main flow. So we trace down the length of the already-drawn main flow for a random number of points and make that the target for the new flow. Moreover, if a flow hits another flow before reaching that point, it will end, so it's possible for one tributary to flow into another one before either reaches the main river.

That gives us this:


The flow volumes for the tributaries are taken from the source cells for the tiles that the tributaries are coming from. When a tributary hits an existing river - whether it be another tributary or the main river for this tile - it ends, and its flow is added to the existing river all the way downstream until the exit point of the tile is reached.

Now the map looks like this:


This isn't bad. Also, it's at this point that I had to go back to the global river generation and add lots and lots and lots of tweaks to the depression-filling algorithm and the flow direction calculations to try to get the rivers looking like they go in believable directions. Although I'm writing this account as though I did all the global stuff first and only then did the regional stuff, in fact they go somewhat in tandem because it's only when you can see things at the regional level, sometimes, that you can see what needs changing at the global level.

If there is precipitation in the tile a river is flowing through, it gets additional flow volume from that precipitation. At the moment, this isn't modelled very well - each river just abruptly increases in volume as it passes from one tile to another. (You can see that at some points on the map above where rivers get darker blue at sudden points.) In reality this extra volume would be delivered into the river from other tributaries which arise within the tile. So let's add those!

For each tile, the program now starts off the main river with the total flow of the previous tile that it just came from. It then calculates how much additional flow it should be receiving in the current tile, minus the amount that comes from other rivers entering the tile. This is the amount that should come from small rivers that arise within the current tile (call these springs). It creates several such springs, dividing the additional flow between them, and makes them flow until they hit an existing river. When they do, their flow is added to that river all the way downstream to the exit point of the tile, just as with other tributaries.

Now we get tiles like this:


The main river here flows from the east and leaves the tile to the west. A tributary comes in from the northeast, and other rivers can be seen passing in the northeastern and southeastern corners (remember that tiles share their corners with neighbouring tiles, so these are really rivers in those other tiles). Several springs rise in the tile and flow into the main river. This image doesn't show the relative flow sizes, which makes the map look somewhat confused, but if you examine the flow directions and sizes for each cell it makes sense.

So, skipping over the months of bug-hunting and attempts at optimising this stuff, we have a river network on the regional map that looks quite decent. The rivers wiggle pleasantly across their tiles and meet up more or less convincingly, and the flows are correctly calculated. But what about erosion? We ignored that at the global scale, but we can't at the regional scale, where the effects of fluvial erosion ought to be much more apparent. Rivers ought to erode away the land over which they pass, if they're moving swiftly. If they move slowly, they deposit material. Both of these are notoriously complicated to model.

Here's my solution. You'll notice that, in designing the river courses over each tile, UW has completely ignored the actual terrain in that tile. In general, of course, the rivers will follow the terrain downhill from tile to tile, because that's how they're calculated at the global level, but this ignores whatever local lumps and bumps have been generated within the tile at the regional level with our ever-useful diamond-square method. This is because UW actually does the rivers before it does the local terrain.

The idea is to work out the heights of just the regional cells that the rivers pass over, during the river creation phase. Within each tile, each river starts at the height of the global source cell for the tile it just came from (minus a constant, because rivers should be generally lower than the rest of the terrain in their tiles). When it leaves the tile, it is at the height of the global source cell for the current tile, minus that same constant. The program makes it drop by the appropriate amount as it passes through the tile.

This is more complicated than it might sound, because of tributaries. It may be that a tributary enters the current tile from a tile that is lower than the height of the main river at the point that it hits it. In that case, the height of the rest of the main river has to be recalculated to accommodate it, to ensure that the tributary doesn't leap uphill to join the main river. This may result in a sudden drop in level from the higher part of the main river to the lower, but that's fine - it could be a waterfall.

Anyway, once all these complications are worked out, we have a river system with each river cell assigned a height on the height map, such that the rivers flow constantly downhill. (In fact a lot of the time they flow over completely level ground, but we can live with that.) Only then do we move to the terrain creation phase, using the methods already described. Now the diamond-square algorithm is set so that it doesn't attempt to assign heights to points that already have them; and it will react to existing heights by taking them into account when assigning heights to other points. Because we subtracted a constant from the global source cell height when assigning heights to the rivers, they are lower than most of the rest of the land within the cell. Also, we set the algorithm to mostly nudge heights up when creating the terrain. The upshot of all this is that the land tends to bulge upwards around the rivers, which looks pretty much like the rivers have carved valleys through the land.

The effect can be fairly subtle on the elevation map, but you can now see rivers running through valleys, with hills rising around them:


It's also visible on the relief map, which shows only rivers above a certain flow level. You can clearly see some of the valleys created by smaller, otherwise unseen rivers:


This also has an effect on coastlines. If the river height level is lower than sea level, we get an inlet. So for example:


I think this looks pleasingly natural. In fact when I set this up originally it happened much more often. Something I've done since then (who knows what?) has raised land levels near the coasts and caused this to happen a lot less often. I'm trying to get it to be more frequent again, but that's yet another work in progress. You'd think I could just make the rivers lower, but that seems to break them in incomprehensible ways, so I'm going to have to think about it.

That aside, we're almost there. One more thing to do is to tinker with the visible width of the rivers and their associated valleys. As it stands, every river is one cell wide (i.e. 2 km). Really big rivers should be wider than this. And even more modest-sized rivers might be expected to have wider valleys.

So I add a function that goes over the tiles and increases the visible width of the rivers. Rather than monkeying about with the river array, this uses another array, so that we retain the "real", central portion of the rivers on the proper river array and use the other one simply for the extra bits that are added to make them wider. (This is much easier to do than to explain.) This is simply done by working out how wide the river should be at each point, and if it's more than 2 km, drawing a circular blob of extra river over that point. Wider valleys are equally straightforward, with the program drawing a circular blob of the appropriate height on the height map around the river cell in question.

Here are some images showing the effects. Here is a medium-sized river with an extended river valley around it, which on this visualisation is marked in green:


These green areas are forced to have the same height as the river at that point, so the effect is of a wider, flat valley floor.

A larger river has a much larger valley:


And a larger river still actually takes up more cells itself. They are marked in lavender-grey:


The centre of the river is marked in blue, showing that this is the "real" course of the river, but on the regional relief map it will appear to be three pixels wide - with, of course, an even wider valley around it. (On the river map, we still show all rivers as just one pixel wide, but with higher flows shown in darker blue, as I think that is more useful for seeing their precise courses.)

The relief map of the region we've been looking at now looks like this:


And if you look at the height map, you can see the large valleys around the major rivers:


Was that worth the many months of failures, incomprehensible errors, rivers flowing uphill, coastlines going berserk, all relived in feverish dreams night after night? Probably not, but I'm sure I'm a better person for going through it. Anyway, the next job is to get the rivers to interact properly with lakes, which is where it gets a bit tricky.

Regional climates

Now we have the terrain sorted for the regional map, it's fairly straightforward to do its climate too.

We already have precipitation calculated for the global map. So we can just adapt the diamond-square algorithm that we used for regional terrain to precipitation. Here's a random area of terrain:


And here's the precipitation map:


You can see how it looks roughly right, with the mountains casting a clear rain shadow to the east. (I think that patch of rain in the south is something to do with the mountains being rather lower there, but if not, it's undoubtedly some complex set of local conditions and definitely not an awful glitch in my climate algorithms.)

Temperature is tougher, for two reasons. First, the range of possible temperatures is much smaller than the range of possible precipitation amounts. That makes it hard to use the diamond-square method to get smooth gradients. The solution: multiply the temperatures by a constant, to make them all much higher (or lower, if below 0). Then run the diamond-square method. Then divide them all back again. This sounds clumsy but it does work.

The second reason it's tougher is that temperature is affected by altitude, and we want it to reflect the terrain on the regional map properly. That means we can't just blur a global-level temperature map, which is what the diamond-square method is effectively doing. The solution: remove the elevation element of the temperatures. Then run the diamond-square method. Then go over the whole regional map and add the elevation element back in. The result:


You can see that the temperatures are properly lowered precisely where the mountain ridges and peaks are, but not in the valleys, rather than being generally lower over the whole mountain area.

Now we have temperatures and precipitation for the regional map, we can easily produce a climate map using that information:


And we can also produce a relief map, using exactly the same methods as for the global map, which hopefully looks a bit more pleasing to the eye:


Finally, sea ice. This is sorted in much the same way as temperature. There are only three possible values for sea ice (none, seasonal, and permanent), so a fair bit of clever tinkering is needed to make this work with the diamond-square method, but it does. Here's the transition between permanent and seasonal ice near the North Pole:


There are a few annoying little artefacts there, which I haven't got round to dealing with yet, but generally this works fairly decently.

Wednesday, February 13, 2019

Making mountains

Consider the following regional height map:


This is supposed to be a mountain range. I've included the grid to help with scale. Each of those squares is a tile, and each one corresponds to a single cell or pixel in the global map. So each one represents an area 32 km across.

Which means that that mountain range is like nothing you'd see on Earth. It's at least a hundred kilometres across for much of its length, and it has only a single (very vague) central ridge. So if you were to walk across it from one side to the other, you'd just have a very long, gradual, undulating slope upwards, and then another one downwards.

Compare a real mountain range, such as the Alps:


It has lots and lots of ridges on a much smaller scale, with valleys in between them. That's the effect we need to replicate if our mountains are to be at all convincing.

It was when I realised this, while doing the regional map, that I went back to the global map and rethought the mountains completely. Originally they were just long blobs, which looked nice at the global level but were hopeless at the regional level. As I posted earlier, I changed the design of the mountains so that they are stored in two arrays: one stores the height of the mountains in each cell, and one stores the direction of the ridges. Here, again, is what that looks like in diagrammatic form:


The greyscale shows the height of peaks in each cell, and the yellow lines are the direction of the ridges. These ridges can meet and divide - any given cell can have ridges going off in any or all of the eight directions. (That means that the ridge information for each cell can be stored as a single eight-bit byte, which I think is nifty.)

As we saw before, on the global map only the heights are used - the ridges aren't needed at that scale. And UW maintains two global maps: one with the mountains, and one without, because that allows it to fill depressions on the no-mountains map, to work out the rivers, without creating absurdly high plateaux. So what we'll do now is to change the regional map so it is calculated only from the no-mountains global map, not the one with mountains. And then we'll add the mountains onto that using a different technique.

First, then, we make UW calculate the regional height map from the no-mountains global map:


There's still a noticeable rise in the land where the mountain range was. That's because, when UW makes the no-mountains map, it raises the terrain under the mountains a certain amount. It does this so that rivers (which are calculated on this map, not the mountains map) still run away from mountains, as they should. So we get this gradual rise in the land on the regional map too. But that's good - the ground does typically rise gradually towards mountains, before crinkling up into the ridges and troughs of the actual ranges.

Now we draw the mountains over the terrain. It's fairly straightforward really. As with the basic terrain, we go over it tile by tile. For each tile, we first establish the directions in which ridges are coming into the tile from its neighbours. This is easily done, by reading it off the ridge array. Now the ridges that are coming in from the NW, NE, SW, and SE must do so from the corners of the tile, because those are the only points where it touches its neighbours. What about those that come in from the N, S, E, and W? We could make it so that they come in at the middle of the tile's sides. That would be consistent and easy to calculate, but it would make the mountain range look far too gridlike - it would be obvious how it was made. Instead, we need to make them come in from random points on the tile's sides. But they have to join up with the corresponding ridges in the neighbouring tiles.

The solution is something we've already seen when creating the basic terrain: random number seeds for each side of the tile. The northern and western sides of the tile are assigned the same RNG seed as the tile itself. The eastern side gets the RNG seed of the tile to the east, and the southern side gets the RNG seed of the tile to the south. Now we go through each side in turn, resetting the RNG seed and then choosing a point at random on that side to be the ridge entry point. This ensures that when ridges pass from tile to tile they always meet up.

(A complication: if we do this then the northern and western ridges will always look similar, because they're randomised from the same seed number. So the northern seed gets another value added to it to make it different. That means we have to do the same to the southern seed, of course, because that's just the northern seed of the tile to the south.)

We'll be drawing the ridges from these entry points to a central junction point, where they all meet. Of course we don't want that to be right in the centre of the tile because that would create a grid effect, so we offset it by a random amount.

Now we can draw the ridges. For this, we use splines again. Each ridge is simply a spline that goes from the entry point on the side to the central junction point, via a middle point which is also offset by a random amount.

The result is a series of lines showing where the middles of the ridges will be:


You can see that the ridges don't seem to be perfectly aligned with the higher ground, but that's OK - it just means that the land will be sloping more gradually up to the mountains on one side than on the other, and that adds realism too. It's caused partly by the fact that the ridges are drawn through the middle of the tiles while the terrain heights are calculated from the corners, and partly by randomness governing which tiles UW raises the height in, and by how much, when making the global map.

To make these into more reasonable-looking ridges, we need to do two things. First, we need to make the heights of the ridges change more gradually - you can see sharp changes in the heights in the image above, where the ridges pass from one tile to the next. We should also add randomness to this height variation, so the ridges rise and fall naturally. Second, we need to make the ridges wider and slopier. This is straightforward too: instead of just raising the terrain of a single point, we paste a peak template over the ridge points. In fact, to add ruggedness to the ridges, we'll only draw peaks over some of the points of the ridges.

Adding these changes yields this:


This is starting to look something like a mountain range!

But the valleys in between the ridges are too wide. In fact, real mountain ranges have buttresses, or sub-ridges, running off the main ridges in a more complex system than we've got here. I spent some time trying to make buttresses that ran off perpendicular to the direction of the main ridges, and couldn't get it to work. In the end I just made buttresses go off in random directions. The effect is pretty similar:


And really that's it. I suspect that this method will need further tinkering should I develop UW to include a still closer level of zoom. The peaks may need to be narrower, the buttresses may need to be longer and taller, and they may even need to have buttresses of their own, if it's to look convincing closer up. But all of these things can be added easily if they prove to be needed. As it is, the system produces what seem to my inexpert eye to be pretty believable mountain ranges at this scale:


Where the ranges are lower, we get smaller mountains and, effectively, hills: