

This is supposed to be a mountain range. I've included the grid to help with scale. Each of those squares is a tile, and each one corresponds to a single cell or pixel in the global map. So each one represents an area 32 km across.
Which means that that mountain range is like nothing you'd see on Earth. It's at least a hundred kilometres across for much of its length, and it has only a single (very vague) central ridge. So if you were to walk across it from one side to the other, you'd just have a very long, gradual, undulating slope upwards, and then another one downwards.
Compare a real mountain range, such as the Alps:

It has lots and lots of ridges on a much smaller scale, with valleys in between them. That's the effect we need to replicate if our mountains are to be at all convincing.
It was when I realised this, while doing the regional map, that I went back to the global map and rethought the mountains completely. Originally they were just long blobs, which looked nice at the global level but were hopeless at the regional level. As I posted earlier, I changed the design of the mountains so that they are stored in two arrays: one stores the height of the mountains in each cell, and one stores the direction of the ridges. Here, again, is what that looks like in diagrammatic form:

The greyscale shows the height of peaks in each cell, and the yellow lines are the direction of the ridges. These ridges can meet and divide - any given cell can have ridges going off in any or all of the eight directions. (That means that the ridge information for each cell can be stored as a single eight-bit byte, which I think is nifty.)
As we saw before, on the global map only the heights are used - the ridges aren't needed at that scale. And UW maintains two global maps: one with the mountains, and one without, because that allows it to fill depressions on the no-mountains map, to work out the rivers, without creating absurdly high plateaux. So what we'll do now is to change the regional map so it is calculated only from the no-mountains global map, not the one with mountains. And then we'll add the mountains onto that using a different technique.
First, then, we make UW calculate the regional height map from the no-mountains global map:

There's still a noticeable rise in the land where the mountain range was. That's because, when UW makes the no-mountains map, it raises the terrain under the mountains a certain amount. It does this so that rivers (which are calculated on this map, not the mountains map) still run away from mountains, as they should. So we get this gradual rise in the land on the regional map too. But that's good - the ground does typically rise gradually towards mountains, before crinkling up into the ridges and troughs of the actual ranges.
Now we draw the mountains over the terrain. It's fairly straightforward really. As with the basic terrain, we go over it tile by tile. For each tile, we first establish the directions in which ridges are coming into the tile from its neighbours. This is easily done, by reading it off the ridge array. Now the ridges that are coming in from the NW, NE, SW, and SE must do so from the corners of the tile, because those are the only points where it touches its neighbours. What about those that come in from the N, S, E, and W? We could make it so that they come in at the middle of the tile's sides. That would be consistent and easy to calculate, but it would make the mountain range look far too gridlike - it would be obvious how it was made. Instead, we need to make them come in from random points on the tile's sides. But they have to join up with the corresponding ridges in the neighbouring tiles.
The solution is something we've already seen when creating the basic terrain: random number seeds for each side of the tile. The northern and western sides of the tile are assigned the same RNG seed as the tile itself. The eastern side gets the RNG seed of the tile to the east, and the southern side gets the RNG seed of the tile to the south. Now we go through each side in turn, resetting the RNG seed and then choosing a point at random on that side to be the ridge entry point. This ensures that when ridges pass from tile to tile they always meet up.
(A complication: if we do this then the northern and western ridges will always look similar, because they're randomised from the same seed number. So the northern seed gets another value added to it to make it different. That means we have to do the same to the southern seed, of course, because that's just the northern seed of the tile to the south.)
We'll be drawing the ridges from these entry points to a central junction point, where they all meet. Of course we don't want that to be right in the centre of the tile because that would create a grid effect, so we offset it by a random amount.
Now we can draw the ridges. For this, we use splines again. Each ridge is simply a spline that goes from the entry point on the side to the central junction point, via a middle point which is also offset by a random amount.
The result is a series of lines showing where the middles of the ridges will be:

You can see that the ridges don't seem to be perfectly aligned with the higher ground, but that's OK - it just means that the land will be sloping more gradually up to the mountains on one side than on the other, and that adds realism too. It's caused partly by the fact that the ridges are drawn through the middle of the tiles while the terrain heights are calculated from the corners, and partly by randomness governing which tiles UW raises the height in, and by how much, when making the global map.
To make these into more reasonable-looking ridges, we need to do two things. First, we need to make the heights of the ridges change more gradually - you can see sharp changes in the heights in the image above, where the ridges pass from one tile to the next. We should also add randomness to this height variation, so the ridges rise and fall naturally. Second, we need to make the ridges wider and slopier. This is straightforward too: instead of just raising the terrain of a single point, we paste a peak template over the ridge points. In fact, to add ruggedness to the ridges, we'll only draw peaks over some of the points of the ridges.
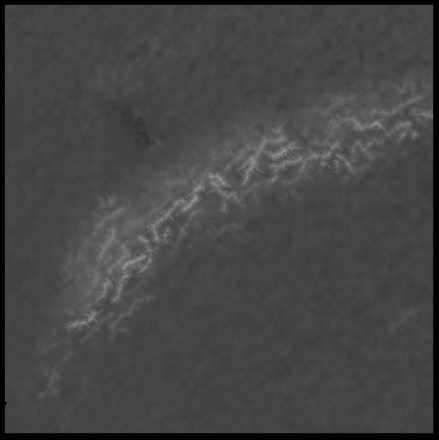
Adding these changes yields this:

This is starting to look something like a mountain range!
But the valleys in between the ridges are too wide. In fact, real mountain ranges have buttresses, or sub-ridges, running off the main ridges in a more complex system than we've got here. I spent some time trying to make buttresses that ran off perpendicular to the direction of the main ridges, and couldn't get it to work. In the end I just made buttresses go off in random directions. The effect is pretty similar:
And really that's it. I suspect that this method will need further tinkering should I develop UW to include a still closer level of zoom. The peaks may need to be narrower, the buttresses may need to be longer and taller, and they may even need to have buttresses of their own, if it's to look convincing closer up. But all of these things can be added easily if they prove to be needed. As it is, the system produces what seem to my inexpert eye to be pretty believable mountain ranges at this scale:


Where the ranges are lower, we get smaller mountains and, effectively, hills:


Fantastic!
ReplyDeleteThanks! I must admit to being quite proud of my mountains.
Delete